Thursday, September 14, 2006
Double-Knit Scarf
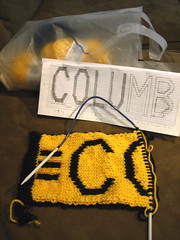
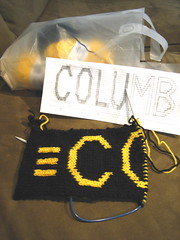
I know I haven't posted in a long while. That has had a lot to do with the fact that the project I have been working on the most is, although not a suprise, a present for my father that I didn't want him to see fully before receiving it.
It is a Double Knit scarf in Superwash wool. Double knitting (for those who don't know) is a way of knitting two sides of a piece at the same time, creating stockinette on both sides. If each side were a flat color this would create a long tube, but with any switches in color the two sides take advantage of working with two yarns at once by switching the yarns between the sides both binding the two sides together, and in most caseseconomically using yarn that would otherwise simply be stranded in intarsia work. The method is ideal for intarsia type projects where the second side is a perfect mirror of the front, and is only slightly harder (but still better than intarsia) on items like mine where the image on the other side is not a perfect mirror (although letters like "C" and "O" were mirrored and I was so thankful to start with them)
The finished scarf reads "Columbus Crew" celebrating my father's favorite soccer team. My brother informed me that a good "soccer scarf" should be able to act as a banner, so the words run lengthwise and it can be easily flipped back and forth to reverse the colors.
I've finished the scarf now, but I'll wait until he has received it to post the final photos.
Friday, August 04, 2006
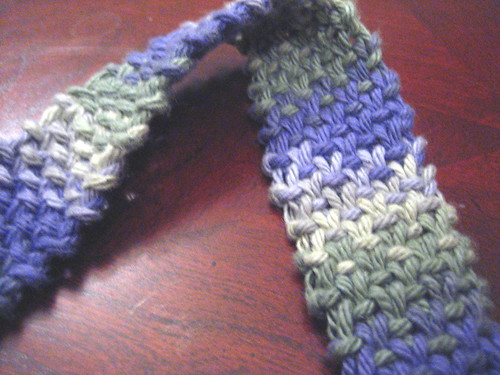
Market Bag
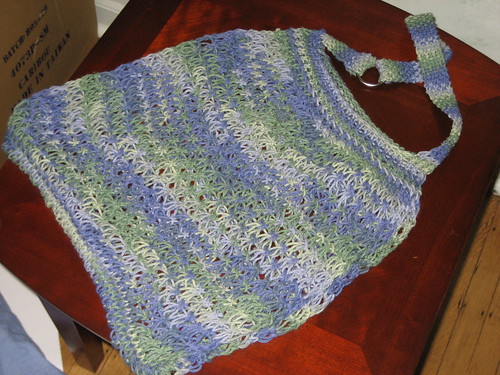
I realized that I hadn't posted on this and then posted saying I had "left over" yarn from a project I hadn't shown...oops! So I did this market bag with a pattern from Mag Knits for the body and my own variation for the top and handle.
The body is made with an interesting S1,K1,YO,PSSO pattern that not only looks great but has a great deal of stretch in the finished project (read I can fit all the Trader Joe's Frozen food I want in it!)
At the top I picked up fewer stitches than called for in the pattern and did a tunisian slip stitch pattern for a couple of rows to define a separation. The original pattern called for a garter stitch handle grafted in the middle. ICK!
Not only was I worried about how much the garter stitch would slip, but I really didn't want to have to have a graft line. I solved this in two ways: First I used a basic slip stitch pattern (slip every other stitch always with yarn held at the front) that looks a bit like a weave and then I used a circular silver ring I had stashed away in my tool box as both an excellent way to join two sides, and a place I can clip my keys onto while shopping (wouldn't want them falling through the holes.)
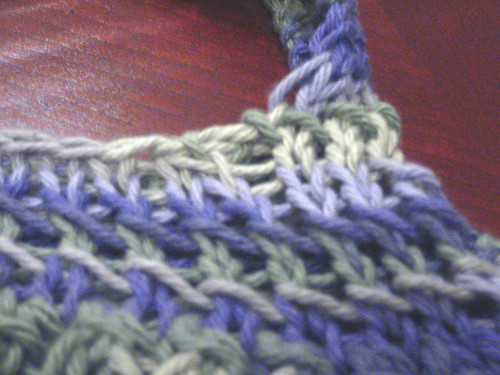
Tunisian Slip stitch around top of bag
Woven Slip stitch handle
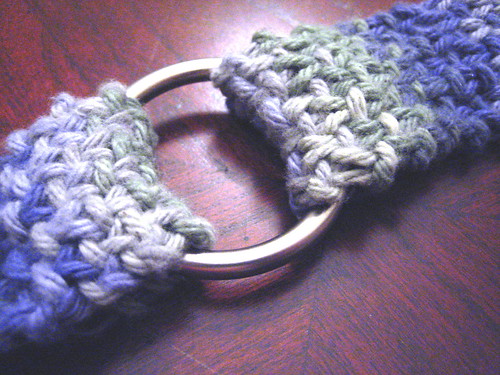
Joining ring
Visit my Non-Knitting blog here
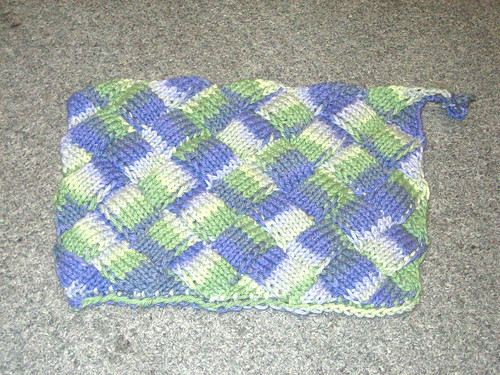
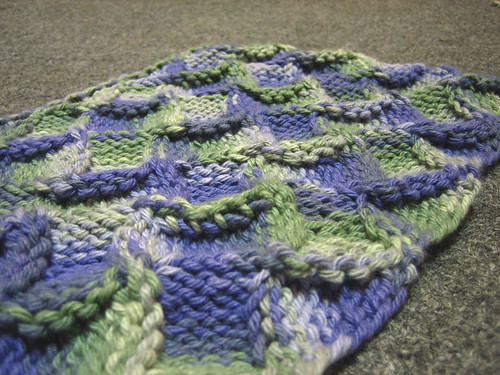
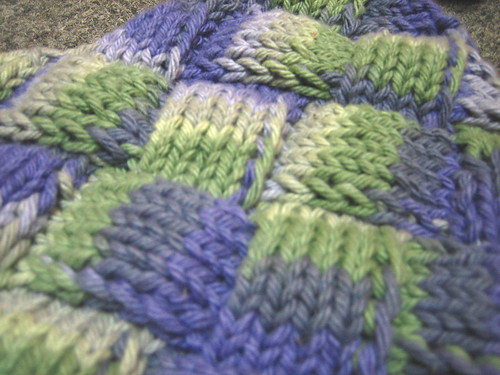
Entrelac

Entrelac
After seeing someone else's project with a short repeat self-striping yarn, and realizing I had some extra, I decided to try out Entrelac, and thought it was interesting and fun...I'd never made something that ends up looking like a weave rather than a knit. I do feel much more confident at picking up edge stitches now and I got to experiment with all sorts of variations in K2tog.
Visit my Non-Knitting blog here
Monday, July 24, 2006
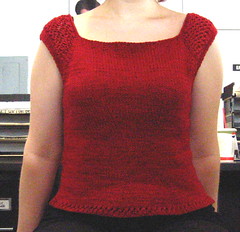
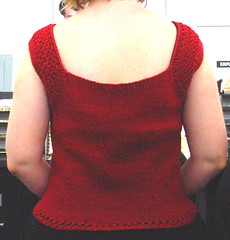
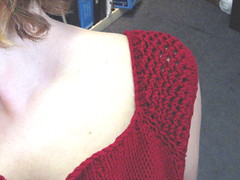
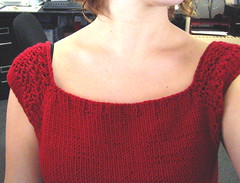
Ruby Red --an actual written post
So I wanted to post the pictures of Ruby Red, but I didn't have the time or energy to really say much about it. Plus I hate what Blogger does to my mental state when I try to make the pictures and text line up in ways that I like while Blogger tries to line them up in ways I never even would have thought possible, probable, or least of all...desirable. Like for instance when it lines up pictures next to the previous day's written post. I frankly was not only amazed and irritated, I was so bewildered that after trying to resize the screen, open it in a different web browser, and then finally insert 50 rows of hard returns I went into the code and tried re-writing it in various configurations and with a few new < things > inserted. Of course the preview button does no good when it comes to the past creeping up on you, or at least prior day's posts, so 5 or 6 republished pages later I thought of the few people that might have RSS feed or something to my sight and all the terrible atrocities of malaligned, repetitive posts they were receiving in their mail and resigned myself to malalignity (if this word has not existed in the past it should have and does now).
So on to the part where I actually discuss the knitting...
I loved this project. I loved the cable cast-on and how it looked in the smooth cotton. I loved how I just kind of measured my shoulders, measured my swatch, did some calculations and then threw all that info out and cast on stitches until it seemed there were enough. I loved working the entire piece on circs, I loved making up a lace pattern on the point that I got to it and thought I should start, and I loved that every step of the way in making this piece I used my problem solving skills to just "figure out" what would be best.
A few things I didn't/don't like from this project: Worsted weight cotton yarn on size 4 bamboo needles= a bit hard on the hands; my sweater "twists" which I think might be the result of the ply of the yarn, as I know of no other reason why something knit in the round would pull continuously to one side; cotton yarn is no fun when weaving in the ends; the sweater only has about a 10-12 hour half-life before it cinderella pumpkins-out and becomes a big bag that continuously slides off my shoulders.
On to the details of the knitting (probably only interesting for the hardcore):
Pre-1.Buy 3 skeins Cascade Sierra cotton on sale at 40% off at Loopy in GORGEOUS colors! Re-read the Tivoli/Picovoli Tee pattern. Measure, calculate, and ignore all conclusions.
1.Cable Cast on (my favorite) until it looks about right (similar to # from Tivoli)
2a.A few rows of stockinette, establishing the 4 corners of the Raglan increases and accounting for my narrower shoulders and desire for lower neckline (longer sleeve depth)
2b.--note: later I dropped back to add 3x1 ribbing to the sides destined to become the front and back to prevent rolling, these ribs lasting for about 5 rounds while the sleeve portion only had about 3 rounds of stockinette and the rolling is slight and unnoticible on the sleeve portion so no ribbing was added.
3. Lace stitch is a YO,K2tog lattice stitch (staggered rather than stacked to create a diagonal pattern--basic rule being either always keep YO left or always right when K2togethering) but I alternated doing a round with knits and one with purl stitches to give a look a little bit more like a diagonal Purse Stitch--bumpy. If I were to do the shirt over again I would probably reverse the pattern on the other sleeve so the diagonals didn't go in the same direction on both...but I didn't on this one.
4. After the lace panels were long enough I did about 5 more rounds of stockinette on the sleeves and body then slipped the sleeve stitches onto holder yarn (note-I always make long loops of yarn for these holders so that I can slip my arms through them when test-trying on the shirt).
5. I did about 5 rows of short row shaping on the front side with increases on each row to create a curved arm hole opening in front and increase both the length of the front and the number of stiches without having a huge arm hole opening (this makes the back of the shirt's neckline a little lower than the front and seems to work well with the sleeves as well, as it seems as if the back of the shoulder is a little longer than the front anyhow)
6. I created a few cable cast on stiches under each arm and knit an inch or so before trying it on and making sure everything fit alright.
7. With the shirt on I placed markers aligning with the center of each breast and then matched those markers on the back of the piece (located center of back and counted stitches to each side to match distance in front)
8. A round or so after reaching the fullest part of chest did right and left sloping decreases at each marker decreasing center panel and leaving side stitches alone.
9. Decreased every third round until shirt fit snug
10. Few inches of straight stockinette and then began increases at same stitch markers, increasing to center every fourth round.
11. At hip size did another inch or so straight stockinette
12. *YO, K2tog* one round.
13. *K,P* three rounds creating 1x1 rib with purls under the K2tog stiches.
14. Split yarn in half (2plys)and BO in 1x1 rib pattern.
15. On the sleeves I came back and using a halved piece of yarn I did a *K1, BO, K2tog, BO* to bind off the edge and pull the cap sleeve around the shoulder without adding a visible edge. I then stiched the edge of the sleeve down about three stiches on front and back with the body of the sweater which further curved the sleevecap and made a smoother line with the armhole opening. The raglan increases made it easy to hide these stiches.
What fun! (I'm such a nerd)
There you have it!
Visit my Non-Knitting blog here
Sunday, July 23, 2006
Monday, July 10, 2006
Oops, long time no post...
The reason for the gap is that I've been delaying the finishing up of several items. I nearly finished the Ruby Red top in about 3 days and then took a week and a half to finish binding off all of the stitches.
Today I finished binding off and gave it a good cold water bath and it is laying out to dry now. I also went ahead and finally washed my peach colored raglan lace top for its blocking as well.
Pictures of Ruby Red to come, I just need it to hurry up and finish drying.
Visit my Non-Knitting blog here
Subscribe to:
Posts (Atom)
